There is a cost associated with every product ever made. The coffee cup you are drinking out of. The chair you are sitting in. The screen you are looking at. Every item around you was produced at some point from some sort of human labor and can have some sort of value placed on the generation of that object. The way that companies make money is to then sell products for a higher value than that cost and therefore make some money on that object. Welcome to the wonderful world of profit margin.
The vast majority of us deal with margin every day whether we realize it or not. Even though the economy is changing to be more service-based as opposed to manufacturing based, we all deal with margin every day. Flipping burgers? Margin. Writing software? Margin. Selling cars? Margin. This is simply the difference between the seller’s cost for acquiring products and the selling price. If your company sells something to someone else then margin can be calculated.

Gross Profit Margin is a key value that is talked about when understanding a company and the products that they sell. This can vary wildly from business to business. Apple’s reported previous 12 months profit margin is 37.8%. However, some of their highest costing phones have massive profit margins. It is estimated that the iPhone XS costs $450 to make but it retails for $1250, a massive $800 in profit on each handset for an astounding 64% profit margin.
Compare that with Amazon which posted a low 3.05% profit margin for Sept 2019. These are super slim margins for most product sales – Amazon offsets this with a monumental $51 billion in sales. How would like to only make $3.05 for every $100? If this was $1,555,500,000 for $51 billion in sales would that be enough?
This all comes down to margin. How much money are you making for each product being sold? This is a lifeblood of a company and defines how much money is leftover for things like payroll and bonuses along with R&D for the next round of products. Getting margin right is tied into every facet of business operations.
This article will focus on manufacturing margin going forward. We will use the manufacture of a fictional product to illustrate margin. It should be noted that there are a million-and-one ways to manufacture products. Having led teams that design manufactured goods for many years now this is how I have seen this process implemented many times over. I am also very confident in the general accuracy of the numbers and process here. When you find yourself estimating margin in your head during the design phase of a product and then hitting that target upon achieving full production you are either lucky or have done this enough times to get a good sense for how this stuff works.
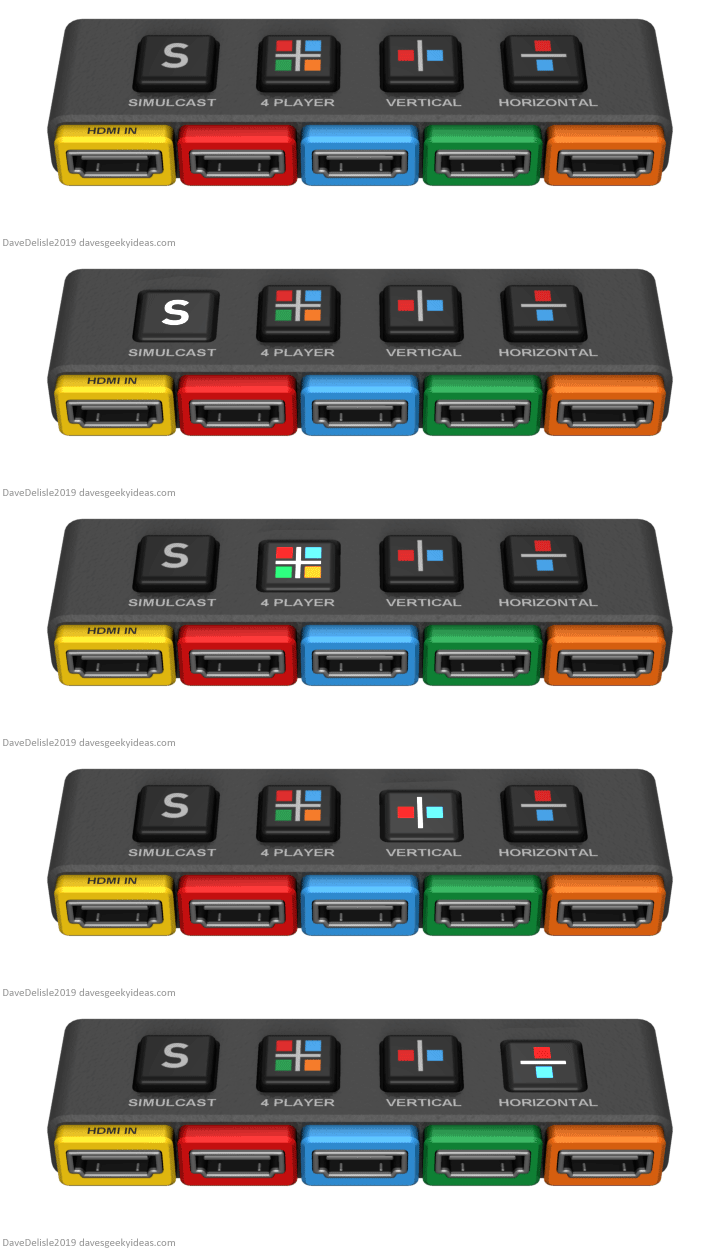
In order to truly understand margin you need to actually build a product. Meet the Retro Game HDMI Splitter:
The idea for this product is not of my own invention. Dave Delisle is a wonderfully talented individual who runs a blog dedicated to none other than Geeky Ideas that he comes up with. I stumbled upon his blog, Dave’s Geeky Ideas a number of years ago and it has been bookmarked ever since and I check up on it every few months to see what fun and fresh product ideas he generates. It is a very fun read and you should check it out. He also states in his FAQ that his posts can be shared online with attribution and linking back to his site (Mr. Delisle if you ever read this and I haven’t met your terms correctly please let me know!).
So now we have our product design, requirements and other information. Let’s build this thing!
To start, let’s shoot for a target margin of 50 points. 50 is an easy number to use here because it is easy to calculate and understand. Depending on the company, product mix, and many other factors like market share, customer base, etc. differed margin targets may be set for a specific product. This part of the discussion is important. Sometimes when building a directly competing product market conditions warrant specific sales pricing. Then Engineers really need to get creative and drive down the cost as much as possible to answer a question like this: can we hit 30 points of margin on the product if we sell it for $499? This becomes a complex Engineering problem quickly. In this case we will ignore these factors and base sales price off of cost along with our goal of 50 points.
The first thing we need is an estimated BOM. BOM stands for Bill of Materials and consists of all of the bits and pieces that we need to assemble our product. Since our Retro Game HDMI Splitter is fairly simple the BOM for this product is fairly short. It will consist of the following:

This is a super simplified BOM. I also made up all of the numbers for illustration purposes. For this product we will be using a plastic injection molded case, 4 custom buttons for the top of the unit, and a PCB with surface mount electrical components. PCB stands for Printed Circuit Board. There will actually be a separate BOM for the PCB that will probably have 40-50 components in it that an Electrical Engineer will generate for the board vendor. This will include things like the HDMI splitter chip, a microprocessor for our firmware to control the unit, various resistors and capacitors for electrical signal and power management and 4 multicolored through-hole surface-mount HDMI connections. We want to use through-hole mounts here so that these connectors are firmly attached to the board so that the whole thing doesn’t fall apart when someone gets a little rough yanking on the cables attached to the unit. Additionally, the PCB BOM and accompanying schematics will also describe the actual printed circuit board that is made at a PCB vendor. The bare board will then go to the assembly stage where all of the chips, resistors, and other components are mounted to the board and soldered together. When we receive the completed board it will be ready to be programmed and then put inside the case.
Now we have our primary components all set up and ready to go. Unfortunately, we are not ready to start stocking this on store shelves yet. There is still quite a bit of work to be done and costs to be accounted for. We have our key components, but this product is not considered to be a finished good yet. This occurs when it is ready to sell to a customer. Let’s take a look at some of the other work and costs that need to be done to get to that point with the Retro Game HDMI Splitter:
- Case: Injection molded plastic is everywhere. There are giant molds that are used for deck chairs. There are tiny molds for small bits and pieces of Lego. In our case, we first need our Mechanical Engineer to design the case, get it quoted, and get a prototype run built. This incurs significant cost. The price per prototype unit, as shown above, is $350 per piece (we will need 3 of them) but the temporary, custom mold for creating those units is $3000. We might be able to save some money by renting time on a super nice 3D printer and dropping the cost but there are still NREs (Non-Recurring Engineering) charges associated with this. Let’s use the 3D printer route and call the NREs for the prototypes at $500. The Engineer’s time also needs to be accounted for and it took a full week to complete the design for 40 hours @ a $100 per hour rate.
- PCB: This is another piece that needs prototypes. This is to ensure that the board is working as intended. Here we don’t have any shortcuts that can be used and the NREs will be less, but they are still there. Each prototype unit (we will need 3 of them) is $275 with an over NRE setup charge of $300. Also the Electrical Engineer took a week to design the board for 40 hours @ a $100 per hour rate.
- The board has some basic firmware and the whole things needs to be tested. This will take 20 hours each from a Firmware Engineer and a QA group. 20 hours @ $100 per hour for the Engineer and 20 hours @ $50 per hour for the QA group.
We now need to assemble the units. After some review, a third party group has reviewed the design and manufacturing process needed and can make the whole thing in about 5 minutes per unit at an assembly cost of $3/unit. This isn’t bad since it consists of the following:
- Programming the microcontroller from a computer
- Mounting the PCB in the enclosure
- Screwing down the PCB in the enclosure
- Closing up the case and screwing it shut
- Connecting cables and running a simple QA test process to ensure the unit is fully operational
At this point we are missing a few things! While the tiny screws that are being called out here are very inexpensive, we need to account for them in the BOM. We have also missed two big factors: A power supply and a box. Each of these is important to the product. The thing won’t work without power and the box that it comes in is a key piece of marketing. Nobody wants to buy a plain brown box – you want something eye-catching and exciting sitting on the shelf. So after some more work, we find a company that customizes a box for $1.25 per box and we decide to throw a basic charger in alongside the unit. This runs $3 per unit. Now we cram all of this together and see what the BOM looks like.
Before we take a look at the BOM – we need to account for NRE charges and our Engineering development costs. Typically these are amortized across a certain number of units to spread these bigger costs out. We will use 1,000 units as our first production run and amortise the NRE costs out over these 1,000 units. Now we can take a look at the updated BOM:
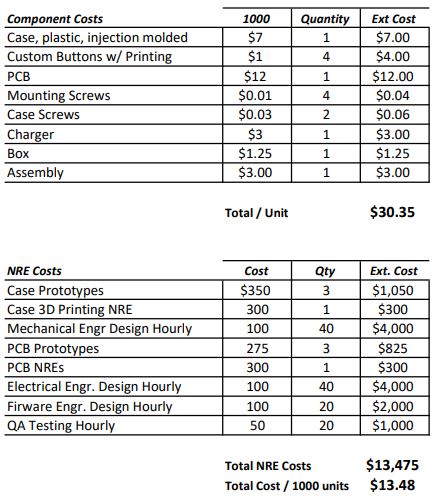
What we see here is that this product for the first 1,000 units will cost $43.83 per unit to make and sell. Once we sell the first 1,000 units the price will drop to $30.35 per unit. How do we change these numbers? When manufacturing goods the pricing depends on quantity. If we could order 5,000 or 10,000 piece quantities of the components then we might get some better pricing. We could also work on the assembly costs, but overall, this is a fairly efficient build so far.
Now we get to the best part. What is our margin? We set a target of 50 points (or percentage) of margin. This calculation is actually very easy. Long term the cost will be $30.35 per unit, so simply double it. Therefore, we would set our sale price of the unit at $60.70. Just for kicks, we will bump it up to $64.99. Does that work? Will people buy it at that price? Hopefully you have a good marketing team or do a lot of research on your own to see if that will work in the marketplace. We might be able to squeeze a few more pennies in cost out, or we could also lower our margin targets. When we change the margin, we also need to understand the margin formula to see what our actual margin amount is. The formula for calculating margin is as follows:

What this means is that you calculate your gross profit per unit ( Sale Price – Cost of Product ) and divide this by the revenue ( Sale Price ) and you get margin. Margin is the percentage of revenue that you get to keep as profit. Therefore, when we bumped the pricing up to $64.99 our margin actually went up to 53.3%. This also means that over the first 1,000 units we will only hit 32.6% margin.
Let’s look at it in slightly different terms. To get our product off the ground it will cost $30,350 to buy and assemble the first 1,000 units and an additional $13,475 in NRE charges for a total of $43,825. If we manage to sell all 1,000 units at $64.99 we will end up with $64,990 and a profit of $21,165. The second 1,000 units the profit would be much higher: $34,640.
Overall, margin is one of the key numbers for any product. It will dictate how much money is left over after paying the bills for building the product. This remainder will be used to pay employees and rent, taxes and electricity. There are downstream numbers like EBITDA (Earnings Before Interest, Taxes, Deductions, and Appreciation) that are used in business accounting but the profit margin gets the ball rolling.
Everything beyond this gets into all kinds of business and marketing topics. Will people buy it for $64.99? Can I make it for cheaper? What about defective units? There are also many topics that in order to keep this as simple as possible I didn’t cover. Things like overhead for warehousing of the finished goods before sales. How will they be sold? Directly through a website? Amazon? All of these things have additional costs. There is plenty of additoinal information on the web around these topics if you want to know more.
What I do know, and what I will leave you with, is that growing up my brother and I along with a couple of close friends set up elaborate card tables and cardboard boxes to prevent each other from seeing the various screens when playing these retro games. This would have been an amazing product back then that I gladly would have saved up and shelled out $65 for. I would like to say a big thank you to Dave’s Geeky Ideas ( https://davesgeekyideas.com/ ) for the product inspiration for this post and for all of you for reading!

Comments are closed, but trackbacks and pingbacks are open.