The command line is awesome.
Seriously – if you have only ever used a mouse to navigate a computer then you are missing out.
Way back in middle school I had a teacher for an anthropology class. One of the lessons from that class that has stuck with me all these years is how amazing and useful the human thumb is.
To illustrate this concept, one day he would have all of the students tape or wrap their thumbs so that they couldn’t use them and then try to complete the school day like that.
Let me tell you – it wasn’t easy.
That is a little bit like using a computer with only a mouse.
Sure – it is useful and handy and all, but you aren’t using all of the tools at your disposal.
So let’s un-tape that thumb and set up something amazing on Windows – bash.

If you aren’t familiar, bash is a command line app that provides tons of useful functionality for linux systems. Instead of rewriting a bunch – just go read this: What is Bash?
If you have an opportunity to work within linux for work or for fun then it is well worth the time as there are tons of nice little commands and functions that are easy to learn and use.
Also – you might be thinking to yourself, “what about windows powershell?“
Well, what about it? It is super useful as well. Go use it if you want. We will focus on getting bash running in this article.
Now on to bash on Windows. This will utilize the Windows Subsystem for Linux (abbreviated as WSL).
This is, per wikipedia: “a compatibility layer for running Linux binary executables natively on Windows 10 and Windows Server 2019.“
There is a ton of information about this from simple google searches. Go read more if you are interested.
What this does in version 2 (WSL2) is to basically run a linux kernel in a virtual environment from within windows. This allows for running things like bash.
So how do we get this up and running?
Step 1 – Enable Windows Features (GUI Method)
From the control panel, search for windows features.

once you click on the ‘Turn Windows features on or off the follow settings box appears. Scroll down and make sure that ‘Virtual Machine Platform’ and ‘Windows Subsystem for Linux’ are checked.

Click ‘OK’. This may take a minute and will probably ask you to reboot afterwards.
Step 1 – Enable Windows Features (Command Line/Powershell Method)
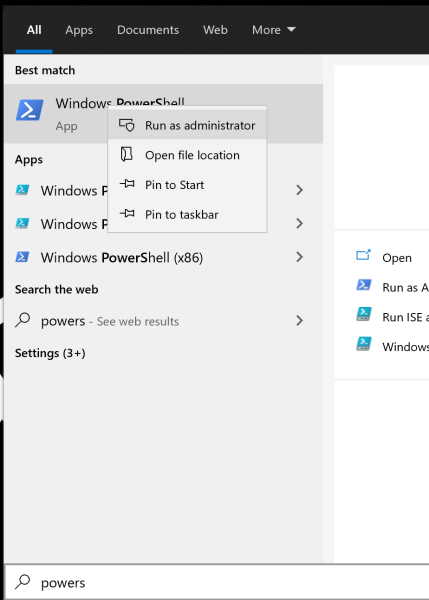
Start by running PowerShell as an admin.
The way I like to do this is to fire up the start menu and simply type: powershell
Once that option comes up then right click on it and select ‘Run As Administrator’. It should look something like this:
A nice blue window should pop up.
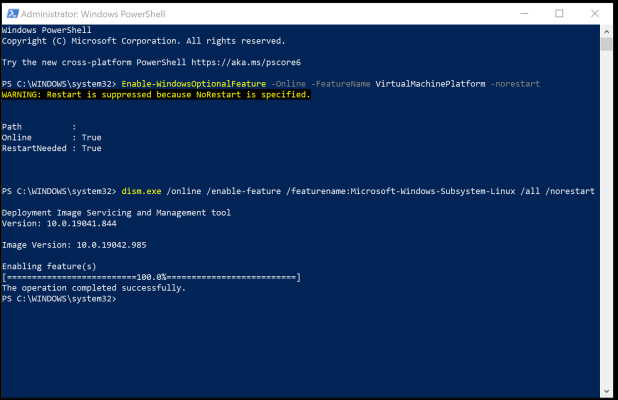
We will be running two commands in this window. The first is this:
Enable-WindowsOptionalFeature -Online -FeatureName VirtualMachinePlatform -norestartThis one is pretty self-explanatory. We are enabling a windows feature using an online option and the feature name is VirtualMachinePlatform. There is also a norestart flag tacked onto the end of the command.
After hitting enter a cool little progress bar is shown then that one is done.
At this point you probably see a ‘WARNING’ message in the PowerShell app calling for a restart. You can restart now if you want, but don’t need to because we are getting ready to run another command.
The next thing to run in PowerShell is:
dism.exe /online /enable-feature /featurename:Microsoft-Windows-Subsystem-Linux /all /norestartThis comes from the handy Microsoft Docs for Enabling the Windows Subsystem for Linux.
This executable is the ‘Deployment Image Servicing and Management Tool’ which is an admin-level, command line tool used to modify or repair features within Windows.
You can see the completed commands in PowerShell below. One note here – in getting screenshots I ran these commands multiple times, so you window might look slightly different.
Step 2 – Reboot
Seriously, no matter what method you used above, do a reboot now.
You just changed Windows and enabled some big features. A reboot is needed and warranted right now.
Step 3 – Grab Linux
Unfortunately, at this point we need to go visit one of my least favorite places in Windows. The App Stote.
The store just feels half-baked to me and seems like the legit apps are baked right in next to the questionable ones.
Anyways, run a search for ‘linux’ or ‘wsl’ and you should get some options. Here is a search on my machine for ‘wsl’:
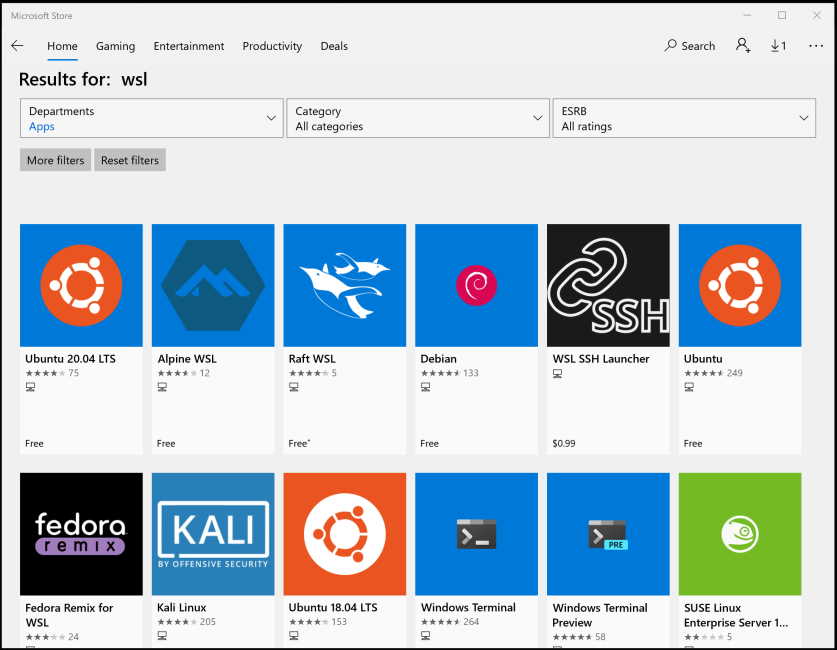
As far as which one to choose? That is up to you. I don’t know the differences well enough to comment much here.
I ended up selecting Ubuntu as the people behind that were the people that worked with Microsoft to get this going so I figured that their stuff might work well.
After selecting your flavor of linux, then doing the weird ‘Get’ and then ‘Install’ in the windows store (seriously Windows – why two steps here? Why would I ‘Get’ something I don’t want to install right now?), now you have linux on your machine!

Step 4 – Starting And Configuring Linux
Now that everything is installed, you can do a couple of things to launch Ubuntu.
The easiest is to go to your start menu. Usually new programs will show up at the top under ‘Recently Added’. If it is there, great.
If not then scroll down and look for the name of the linux flavor that you just installed.
If you don’t want to sue the start menu then you can use the command line. Simply type ubuntu
One thing you need to know here. At this point you need to provide a superuser username and password.
I suggest copying these into your password keeper immediately in case you need them down the line.
Once you have entered these, you should see something like this:

And, just like that, you have bash installed on Windows! Enjoy!
Thanks for reading!

Comments are closed, but trackbacks and pingbacks are open.