The more I write and have ideas, the more the process needs to change to be more efficient. This is very important because as the number of Posts is growing, and the number of Post Ideas grows, the amount of content, media, and other information grows as well. It is starting to get confusing. So today I am updating and documenting an updated process for the blog around media management for both my future use as well as to educate others on how some of this stuff works.
Right now I don’t do a good job of media management. I find a cool image on Unsplash, I try and add it to a collection on there, then I add it to a post and move on. As of the start of this post idea I now have a total of 231 posts (46 published and 185 Post Ideas). Across these 231 posts, a total of 221 items exist in the media library. Yikes! The sheer number of items was recently a problem as I went to repost some of the haiku on Medium in a series: Workplace Haiku. Finding the images that I have previously used for older haiku posts wasn’t easy. I needed a better media management system.
In order to design a better system (note: better, not ideal, as I am sure this will change again in the future) I needed to start with a way to uniquely identify each post. When I design something the goal is to always try and consider the worst case scenario. For the blog I would ideally like to have a blog that is udpated and running for over 10 years, with a solid 3-4 good posts per week. Calculating the numbers, that is 2080 posts over 10 years. Therefore, if I wanted to assign a unique number to each post I would probably use a 4 digit number (i.e. 0000) and start with 0001. This gives me up to 9,999 unique posts before I hit the limit, or almost 5x the intended number of posts over 10 years. Not bad, but is there an easier way?

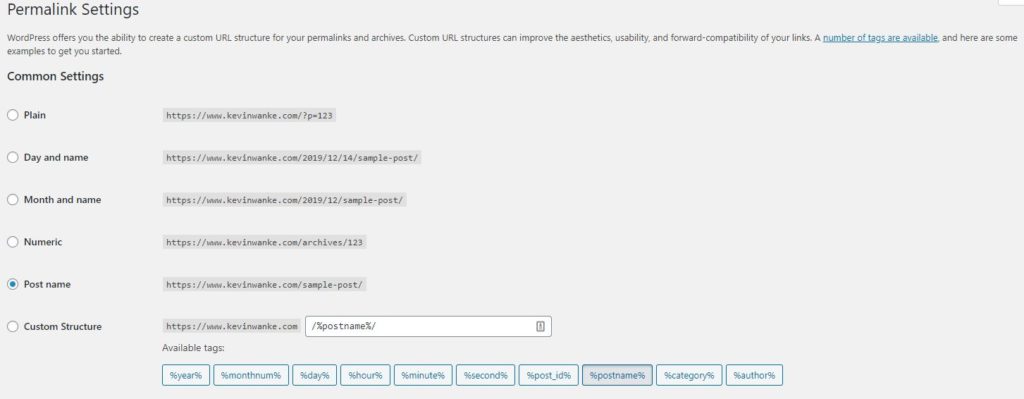
The image above shows the Permalink Settings in WordPress. From the image it is clear that WordPress already offers a way to get a unique identifier through either the “plain” or the “numeric” options on the Permalink Settings page. As you can see above, I am currently using the ‘Post Name’ setting. Now there is a decision to make. Is this the best setting? What are the benefits of changing, and what are the risks? Will I have to go touch or update each of the 46 previously published posts if the decision is made to change to something else? The next step is obvious to me – google it.
Google: wordpress permalink best practices
First result read: Best WordPress Permalink Structure (11 SEO Tips for Bloggers)
Second result read: WordPress permalinks: Tips, best practices and mistakes to avoid
The goal here is to better understand how permalinks are used, try and figure out what would be considered a best practice to follow, and also to try and grasp what consequences might come about from changing the permalink structure. The second link answers this very well:
1. Permalinks present visitors with a synopsis of the content of your website’s page or post without them accessing that content.
From the article: WordPress permalinks: Tips, best practices and mistakes to avoid
2. Search engines use permalinks to find a page, a post, or a topic based on WordPress URLs exclusively.
3. Permalinks offer search engines and visitors a permanent location where they can access the respective content and read it.
4. A permalink is a unique identifier for each sample of material on your website, which allows you to stay well-organized when it comes to keeping track of your content.
After reading through the information on these articles, I have come up with the following attempt at a best practices approach. Shorter is better, skip the dates, and use post titles and/or keywords. After researching and reading I have decided to not change my permalinks. There are two reasons for this. The first is that I don’t want to have to go back and mess with all of the existing posts due to them having already been linked to from external sources. It also appears that the current setting and process already follows the stated best practices for the most part, although shortening the URL slugs will be a target going forward. The second reason is that there is already a unique post id already created for every post and I can just use that!
Now the focus can turn back to media management. For this I am going to use Dropbox. Any cloud-based file sharing utility would work here, I just happen to already have Dropbox setup and operating so it is an easy lift. The reason for using a file sharing app is that I often write on multiple platforms. Desktop, laptop, and mobile. Using a file sharing app like Dropbox allows the target material to be accessible from any of these devices easily and quickly. From this point forward, any time I am working on a blog post the process to create a new Post Idea is as follows:
- Select the ‘Add New’ function on the Posts menu
- Type in a post title placeholder (example: ‘How To Create a New Post’)
- Use the ‘Save Draft’ link in the top right of the post editing window to save the draft
- Get the Post ID from the updated URL in the browser (URL will change from something like this: https://www.kevinwanke.com/wp-admin/post-new.php to this https://www.kevinwanke.com/wp-admin/post.php?post=1234&action=edit) and edit the post title placeholder to show the ID (example: ‘1234:How To Create a New Post’)
- Add in any other Post Idea information (text, links, targets, goals)
- In Dropbox create a folder of the same name (folder name example: ‘1234:How To Create a New Post’)
- Store any pictures, media, or other files for the post in the folder
This process update should greatly enhance updates and future lookups for post information! Now there is one other item around media management that I noted while looking through my media library. While looking at previously posted media, there is some default information in the media metadata that is very useful.

Here I can see what post this image is in, when it was uploaded, file size, dimensions, etc. What I also see here is that I am doing a bad job with the user defined metadata! So it is time to update the media creation process! Right now I use a super simplified process. While writing a post I select the image block, select the upload button, upload the target image and move on. This kind of leaves the images hanging out there without any additional information. And as I get the majority of images from free sites like Unsplash and Pixabay, I really like to credit the image creators because it is a nice thing to do. So how do I achieve better media management inside WordPress? Let’s head back to google to try and figure this one out.
Google: wordpress plugins media
First result read: 8 Best WordPress Media Library Folders Management Plugins 2019
Second result read: The Best WordPress Media Library Management Plugins
My initial choice was to go with the top plugin in both of these articles, however, before I ran off to install a little more digging is always a good thing. This proved useful as the top item, FileBird, has a few caveats. First, the first result read was written by the creators, so of course they are going to highlight their own product. Second, while it is free, it is not 100% free. After some digging it turns out that the first 10 folders/categories are free, then it takes a purchase of $25 to unlock unlimited usage. As I am already planning on doing a folder per post (to match up with the Dropbox folder structure defined above) this would be a severe limitation until I shelled out some money. I don’t really want to do that right now! Plus, from a purely personal aesthetic standpoint, I have never liked what I call the ‘Mac/OSX folder styling’ and this plugin appears to use that. It wouldn’t stop me from using it, but it would be annoying.
After doing quite a bit of reading and researching (and going down more than a couple rabbit holes on potentially interesting plugins that have nothing to do with media management…) I have finally chosen Medial Library Assistant to assist in this effort. This is not an idea plugin – I was really looking for something that both allowed me to edit media metadata during the upload process as that is the only real time I have the media source information readily available. However, this plugin will help with managing the media once uploaded. With this plugin in place, I can now modify my media upload process to the following:
- Write a post!
- Add images as normal to the post through the image upload function in the WordPress editor
- After uploading an image, open the library and edit the metadata for the image
This also means that a few additional steps need to be added to the posting checklist. These are added below and are to be done prior to publishing of a post:
- If the post is in a new year or calendar month, using the Media Library Assistant plugin add a new toplevel image category of the year and month (example: 2019-12)
- Add a new sublevel category under the year and month toplevel category using the same naming structure that the dropbox folder used (category name example: ‘1234:How To Create a New Post’)
- Add all images/media used in that post to that category
- also double check that all media has appropriate metadata
Done! That is it! Now going forward the media for the blog should be in a much better structure with searchability through the media library functions on the site. This should also streamline media metadata and provide better SEO results and easier lookups going forward. I hope that this information has given you some ideas on improving your own site. One action item that has come up from creating this post is a realization that I need to be documenting my workflow processes in a consistent location. Therefore, I am also going to be creating a main navigation page to define these processes to go at the top of the blog. Remembe,r there is inspiration everywhere to build content for your blog! Thanks for reading!


Comments are closed, but trackbacks and pingbacks are open.